9 Best Vegan Coconut Dessert Recipes For Your Kids

9 Best Vegan Coconut Dessert Recipes For Your Kids
Coconut fruit is used frequently for its water, milk, and oil.
Coconut trees, native to Southeast Asia and the islands between the Indian and Pacific oceans, are the most widely distributed fruit trees on the planet.
Nowadays, coconuts are grown worldwide and are gaining popularity due to their flavour, culinary applications, and numerous potential health benefits.
So in this article, I’ll share some delicious vegan coconut dessert recipes for your kids.

Health Benefits Of Coconut
In addition to giving your dishes a rich, creamy flavour, coconut has many significant health benefits for us. Each component of this divine fruit, including the coconut husk, coconut water, coconut oil, and coconut shell for crafts, has unique advantages.
One such fruit that not only helps fill out your diet with necessary nutrients but also benefits your skin, hair, and general health is coconut. Your mental and physical health can improve by regularly oiling your hair or gargling it with oil. Continue reading to learn more about the advantages of coconuts and how to utilize them to your advantage.
1. Fiber Content
Coconut has a whopping 61 percent of the daily recommended amount of fiber. The release of glucose is slowed down by coconut fiber, which also transports it to the cell, where it is converted to energy. The pancreas and enzyme systems are helped to recover from stress, which lowers the risk of developing diabetes.
2. Fights Dryness
When applied to the skin, coconut oil keeps it moisturized and supple while preventing dryness and flakiness. Additionally, it supports the skin and works to reverse any damage that has been done to it over time. It alleviates neurosis, a common skin condition marked by flaky, dry, and rough skin. Additionally, it lessens the severity of atopic dermatitis, which is vulnerable to Staphylococcus aureus infections.
The use of coconut removes and destroys toxins, fungi, and bacteria from the skin's outer layers, which not only detoxifies but also strengthens the skin's natural defences.
3. Control Blood Sugar
Insulin secretion and blood glucose utilization are enhanced by coconut. It manages diabetes by positively impacting the hormones that regulate blood sugar. This lessens glycemic cravings and slows the rise in blood sugar levels. Quick digestion and other symptoms of gastrointestinal and bowel disorders are helped by coconut. It provides dietary fiber and aids in the absorption of vitamins and minerals. It also lessens nausea and vomiting.
4. Useful For Dry Hands
Hands that are dry and parched can also benefit from using extra virgin coconut oil. Frequently washing dishes dries out the skin and makes it look bad. Virgin coconut oil can achieve beautiful, smooth hands instead of spending a lot of money on expensive cosmetics filled with chemicals.
5. Improve Immunity
Nutrition from coconuts is fantastic for the immune system. It has anti-bacterial, anti-viral, anti-fungal, and anti-parasitic properties. Consuming coconut oil can strengthen the body's defences against bacteria and viruses that cause disease. So, can you consume raw coconut? Consuming coconut in its raw form can aid in treating some of the worst and most tenacious illnesses, including bronchitis, tapeworms, urinary tract infections, and other conditions brought on by microbes.
6. Reduce Belly Fat
Coconut oil is also helpful for treating harmful abdominal fat. The most harmful of all fats, abdominal fat, is linked to a number of diseases. In just 12 weeks, a daily serving of 200 grams of coconut can result in a sizable decrease in both BMI and waist circumference.
7. Avoid Skin Cancer
By absorbing 20% of the harmful UV rays, it increases the skin's lipid and moisture content and guards against skin cancer. It hydrates the skin by replenishing the natural oils, making it suitable for use as a body and skin moisturizer. Circular motions can be used to rub coconut oil on the face to clean it.
8. Boosts Energy Level
Burning fat helps coconuts increase energy. A coconut is an option if you want to lose weight. The triglycerides in coconut oil raise the amount of energy expended over the course of a day by 5%, which eventually results in weight loss. Additionally, it is known to lessen hunger pangs.
This directly connects to how the body converts fatty acids into ketone bodies, which have an appetite-suppressing effect. People who regularly consume coconut products are better able to go without food for a prolonged period of time without experiencing hypoglycemia. Additionally, it helps alleviate chronic fatigue symptoms and supports healthy thyroid function. However, more research is needed to determine how well raw coconut can aid weight loss.
9. Promotes Blood Flow
Regular coconut consumption increases skin oxygenation and stimulates blood flow. Our cells require an adequate supply of oxygen, which can only be delivered by healthy blood circulation that carries oxygen throughout the body. This promotes a healthy and flawless complexion and allows the skin to breathe properly.
10. Handles Epilepsy
A low-carb diet called a ketogenic diet is used to treat a number of disorders. The treatment of pediatric epilepsy is its most well-known application. The diet calls for eating a lot of fat and little carbs, which can increase the levels of ketone bodies in the blood. When used by children with epilepsy, this diet can significantly lower their seizure frequency.
11. Cares for Oily Skin
Oily skin can also be treated with coconut water. It keeps the skin tone more even and removes extra oil from the skin. Acne, black spots, and other blemishes can all be effectively treated with coconut water. Combine ½ teaspoon turmeric, 1 teaspoon sandalwood powder, and ¼ cup coconut water to make a face pack. Apply it to your face three times weekly for clear, healthy skin.
12. Maintain Hydration
Important electrolytes found in coconut water aid in keeping the body hydrated. People who engage in strenuous activities such as easy workouts should drink as much coconut water as possible. Coconut water hydrates, replenishes lost electrolytes and boosts the immune system. It is a superior option to water because it tastes better and is packed with nutrients.
13. Maintain Youthful Skin
Coconut oil is fantastic for maintaining healthy, glowing skin. Its antioxidant property slows down the aging process by shielding the body from harmful free radicals. Daily massages with a few drops of coconut oil will keep it supple and healthy. Apply it to your skin before taking a shower. While taking a shower, this will allow the pores to open, facilitating more effective oil absorption through the skin.
14. Helpful During Pregnancy
Coconut water is sterile and beneficial to expectant mothers. It boosts the mother's and baby's health and immunity and prevents infection and other diseases. Additionally, it increases amniotic fluid levels to enhance the fetus' overall health.

3 Tips To Store Coconut For Longer
Plan where to store the coconut if you don't intend to use the entire thing the same day you purchase it. There are several ways to keep coconut fresher longer, whether you select the pantry, refrigerator, or freezer.
Although it is possible to store the whole coconut on a shelf in your pantry for a while, keep in mind that you only have a limited time to use it. Unfortunately, even if it appears in perfect condition, storing something for too long increases the likelihood of it rotting inside.
It won't be edible if that happens. The best course of action is to purchase the coconut the day you intend to consume it and save any leftovers for another time.
1. Toast The Coconut
Flakes of toasted coconut are a necessary component in numerous dessert recipes. Additionally, it's a fantastic way to preserve even the tiniest remnants of coconut meat.
Making homemade toasted flakes is easy and doesn't take long. The coconut meat pieces only need to be ground, placed in the oven, and stirred frequently.
If you prefer, cook on the stovetop or in the microwave instead of using the oven. Depending on how crispy you want the flakes, preparation only requires a short time.
You should put the cooled-off toasted coconut flakes in a glass or plastic container. In a pantry, they have a two to three-month shelf life. Placing the flakes in a freezer is better if you want to extend that time.
2. Prepare Coconut Milk
You can use the coconut immediately after opening it or store the meat chunks in the fridge. However, making homemade coconut milk or cream can be simple and valuable.
The dish is straightforward. Put the cleaned meat chunks and coconut water in a blender. Add a cup of tap water in its place if the mature coconut you're using has little water. Blend the ingredients for about 60 seconds on the fastest setting of the blender. After the procedure is complete, pour the milk into a glass bottle.
If you'd like to try something different, you could experiment by adding some vanilla extract, cinnamon, or another sweet spice to the mixture. For three to four days, homemade coconut milk can be stored in the refrigerator.
3. Freeze The Chunks
You always have the option to freeze meat pieces if you don't want to make coconut milk or flakes. Coconut leftovers can be frozen for up to 6 to 8 months if you don't plan to use them immediately.
Open the plastic container, arrange the chopped coconut flesh on top, and sprinkle some sugar over it. The coconut can always be thawed and used to make the milk, or it can be grated afterward.
It is not advisable to defrost it in the microwave because too much liquid will be released. The night before you need the box, take it out of the freezer and let it slowly thaw at room temperature.
Vegan Coconut Dessert Recipes

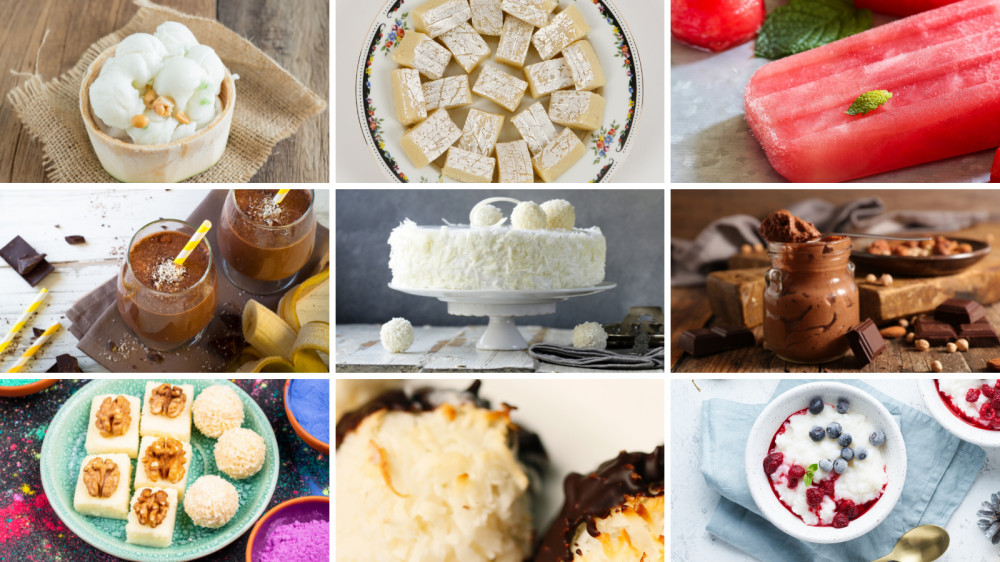
1. Vegan Coconut Macaroons
Making Gluten-Free Vegan Coconut Macaroons is incredibly simple, thanks to this 6-ingredient recipe! Try these homemade sweet and toasty macaroons to satisfy your sweet tooth craving or for dessert!
Prep time: 10 minutes | Cook time: 25 minutes | Total time: 35 minutes | Servings: 12 macaroons
Ingredients
- Unsweetened coconut flakes: 3 cups, finely shredded
- Full-fat canned coconut cream:1 cup
- Maple syrup: ¼ cup
- Coconut sugar (or brown sugar): ⅓ cup
- Gluten-free all-purpose flour: ⅔ cup
- Vanilla extract: 1 teaspoon
- Pinch of sea salt, optional
- Vegan chocolate (optional): 1 cup
- Coconut Burfi
Method
- Put a baking sheet in the oven and preheat it to 350°F.
- In a big bowl, combine all the ingredients (aside from the chocolate) and stir until combined. A sticky consistency should result from the mixture.
- Form small balls out of the mixture by taking 2 tablespoons at a time. Pack the macaroons tightly to prevent them from crumbling while baking. Put the baking sheet with the coconut macaroons inside.
- Bake for 25 minutes, rotating the baking sheet halfway through. Transfer the baking sheet to the oven. After the macaroons have finished baking, take them out of the oven and let them cool for 10 minutes.
- Use the double boiler method or the microwave to melt the chocolate if you're making chocolate-dipped macaroons. After dipping the macaroons in the melted chocolate, they are placed on a baking sheet covered with parchment. The chocolate should harden after 5-8 minutes in the refrigerator. Enjoy!

2. Coconut Barfi
Barfi, an Indian coconut dessert bar, is a low-carb treat. The original recipe includes more sugar and calories than this one, which only calls for four ingredients. This delicacy gains a sophisticated layer of sweetness from adding Indian molasses and jaggery.
Prep time: 15 minutes | Cook time: 45 minutes | Total time: 60 minutes | Servings: 8
Ingredients
- Shredded coconut: 2 cups
- Thick jaggery syrup: ¼ cup
- Elaichi powder: ½ teaspoon
- Coconut oil (to brush sides of the pan)
Method
- At medium temperatures, roast 2 cups of coconut for around 5 minutes. You ought to smell deliciously toasted after. Keep stirring thoroughly, and watch out for the bottom burning. Jaggery should be cut into three to four large cubes, heated with a bit of water, and then strained to create a thick syrup.
- In a powerful blender, combine toasted coconut, ¼ cup of jaggery syrup, and elaichi powder. Use the blender stick to thoroughly push down the mixture until it is thoroughly ground without adding any water. If you use a classic mixer, shake the jar and blend it until everything is thoroughly incorporated. Oil a loaf pan's bottom and sides with coconut oil using a silicone brush or your hands.
- The thick batter or paste should be poured into a loaf pan and pressed against the pan walls until the burfi is of the proper thickness. The pan's whole surface does not have to be utilized. By using a flat spatula, flatten the burfi. If you choose, you can also apply oil to the burfi's top. For about 45 minutes, put the pan in an oven that has been preheated to 325°F.
- Use a freezer to quicken the chilling process, or leave the pan to cool for 30 minutes. Do not attempt to turn the burfi until it has cooled.
- Serve after slicing into pieces.

3. Coconut Milk Fruit Popsicles
Who doesn't enjoy making their popsicles, mainly when they use the finest ingredients? Fresh juices are brilliantly swirled into these popsicles' handmade coconut milk base.
Prep time: 15 minutes | Cook time: 45 minutes | Total time: 60 minutes | Servings: 8
Ingredients
- Coconuts: 2
- Blood orange juice: ¾ cup
- Pomegranate juice: ½ cup
- Light agave syrup: 3 tablespoon
- Vanilla extract: 1½ teaspoon
Method
- Make the coconut milk. Remove the brown skin from the entire coconut by using a vegetable peeler. Add water to the amount of coconut water you measured from your coconuts to make three cups (700 ml) in total. Put the liquid and the coconut meat in a saucepan and heat to a simmer. After three minutes, turn off the heat. Permit to cool slightly.
- Take half of the warm liquid and half of the coconut meat from the pot and pour them both into your Kitchen blender. Set the blender to the “Ice Crush” setting and wait for the cycle to complete. Blend the remaining coconut meat and warm liquid in the “Ice Crush” setting until the cycle is complete. Last but not least, switch the blender to “Icy Drink” mode and let the cycle complete.
- Half of the coconut mixture from the blender should be poured into the center of a large piece of cheesecloth that has been laid out in a large bowl. Gather the cheesecloth's ends in your clean hands, then squeeze the coconut pulp to extract as much milk as possible into the bowl. Repeat with a second cheesecloth and the remaining coconut mixture, transferring the pulp into a bowl and discarding the cheesecloth.
- The popsicles, please. Add the coconut milk, ¾ teaspoon (3g) of vanilla extract, and 2 tablespoons (42g) of agave syrup to the blender. 10 seconds at speed 2 for blending. Fill the bottom ⅔ of each popsicle mould with the sweetened coconut milk. For 10 minutes, freeze the popsicles without the sticks.
- Combine the blood orange juice, pomegranate juice, remaining agave, and vanilla in a tiny bowl with a spout. Pour the juice mixture over the coconut milk layer in the popsicle moulds after quickly whisking it. After inserting the sticks, cover the popsicle moulds with the lids. For at least four hours, freeze. Now let's enjoy it!

4. Toasted Coconut Ice Cream
Enjoy this creamy custard-based ice cream with chunks of toasted coconut and coconut taste. It is called Toasted Coconut Ice Cream.
Prep time: 10 minutes | Cook time: 5 minutes | Total time: 15 minutes | Servings: 4
Ingredients
- Full-fat canned coconut milk: 1 cup
- Toasted shredded coconut: 2 cups
- Pitted dates: ¼ cup
- Virgin coconut oil: 2 tablespoons
- Frozen bananas: 4 cups
Method
- Put the coconut milk, coconut oil, dates, and toasted coconut into your blender in that sequence. Plunge on high for 30 to 60 seconds or until the dates and coconut are broken up.
- Add the frozen banana after cleaning the inside of the lid and the sides of the blender container. Insert the tamper, fasten the lid, and remove the center lid cover.
- Using the tamper to push the fruit through the blades, process on high for 20 to 30 seconds, or until smooth but still frozen.
- For a firmer consistency, refrigerate in the freezer for about 4 hours before scooping out and serving as frozen yogurt. Don't let the food freeze for too long, or ice crystals will form.

5. Vegan Coconut Rice Pudding
You'll adore this rich, creamy rice pudding cooked with coconut milk and flavoured with orange zest.
Prep time: 10 minutes | Cook time: 5 minutes | Total time: 15 minutes | Servings: 4
Ingredients
- Light coconut milk: 2 cups
- Cinnamon: ½ teaspoon
- Vanilla extract: ½ teaspoon
- Cane sugar: 2 tablespoons
- Arborio rice: ¾ cups
- Orange zest: 2 teaspoons
- Water: ½ cup
Method
- Combine coconut milk, sugar, cinnamon, and vanilla essence and bring to a gentle boil on medium-high heat. Remove the cinnamon stick, if using, before incorporating the rice.)
- Add the rice to the saucepan and stir after turning the heat down to medium-low. Up until the rice starts to thicken into a porridge, keep stirring the rice every few minutes.
- Once the rice is mushy and thick, the rice pudding is finished. (Observe for a while.) Add little water to the rice pudding and simmer on medium-low if the rice is still a touch hard inside, but the porridge is thick. Orange zest should be incorporated only before serving. A very delicious item for kids.

6. Vegan Coconut Bar
An easy vegan dessert with only 5 ingredients that don't require baking to satisfy your craving for bounty candy bars.
Prep time: 15 minutes | Cook time: 35 minutes | Total time: 50 minutes | Servings: 6
Ingredients
- Desiccated coconut: 2⅓ cups
- Maple syrup: 3 tablespoons
- Coconut milk: ⅓ cup
- Coconut oil: ¼ cup
- Vegan dark chocolate: 4.2 oz
- Coconut oil: 1 tablespoon
Method
- Combine the unsweetened coconut, maple syrup, unsweetened coconut milk, and melted coconut in a mixing bowl. The sequence is irrelevant.
- If it's too dry, add a little more maple syrup or melted coconut oil as you stir until it comes together. To help break down the coconut and make the batter sticky, you can combine all the ingredients in a food processor and process on high speed for 1 minute.
- Use parchment paper to line an 8×8-inch baking pan. Place aside.
- Using your hands or a spatula, evenly distribute the coconut batter and firmly press it into the pan's bottom. When making almond joy bars, press one raw almond for every square you plan to cut.
- For ten minutes, freeze the tray.
- Add coconut oil and pieces of dark chocolate to another bowl. Melt using a bain-marie or a microwave.
- Take the tray out of the freezer, pour the melted chocolate on top of the coconut bar, and spread the chocolate out evenly with a spatula.
- Again freeze to set the chocolate layer, and wait for 5 to 10 minutes.
- Take the frozen item out and cut it into 16 identical-sized bars.
- The bars can be frozen for three months or kept in the refrigerator for up to three weeks in an airtight container. When you want to defrost each square separately, make sure to sandwich a piece of parchment paper between them to keep them from sticking to one another. Defrosting should take 30 to 45 minutes at room temperature.

7. Vegan Coconut Cake
The simplest vegan coconut cake ever, made with basic ingredients in one bowl. Fluffy, light, and unbelievably soft, with a creamy coconut frosting. This dessert is for you if you like coconut!
Prep time: 15 minutes | Cook time: 35 minutes | Total time: 50 minutes | Servings: 6
Ingredients Coconut Cake
- All-purpose flour: 2½ cups
- Cornstarch:2 tablespoons
- Baking powder:1 tablespoons
- Salt:½ teaspoon
- Granulated sugar: 1½ cups
- Neutral flavoured oil: 3-4 cups
- Non-dairy milk: 1½ cups
- Apple cider vinegar: 2 teaspoons
- Pure vanilla extract: 2 teaspoons
- Coconut extract: 1 teaspoon
Ingredients For The Coconut Cream Cheese Frosting
- Vegan cream cheese: 8 ounces
- Vegan butter slightly softened: ½ cups
- Powdered sugar: 3-4 cups
- Pure vanilla extract: 1 teaspoon
- Coconut extract: 1 teaspoon
- Shredded fine coconut: 1 cup
Method For The Coconut Cake
- Set the oven to 350°F and grease two 8-inch cake pans. A circle of parchment paper has been cut to fit each pan's bottom. Add the flour, cornstarch, baking powder, salt, and sugar to a sizable basin.
- To blend, whisk thoroughly. Pour the oil, non-dairy milk, apple cider vinegar, vanilla, and coconut extract into the bowl with the dry ingredients. Just combine the ingredients with a large spoon; do not overmix the batter, or your cake won't be light and fluffy.
- When a toothpick inserted in the center of the cake comes out clean, bake for 30-35 minutes. Pour into prepared pans. After 10 minutes, carefully remove the cakes from the pan and allow them to cool completely.
- Before frosting, let the cakes cool thoroughly; you can hasten this process by putting them in the refrigerator.
Method To Make The Frosting
- Add 3 cups of powdered sugar, 3 cups of vegan cream cheese, slightly softened vegan butter (do not over-soften or your frosting will melt), vanilla, and coconut extract to a big bowl (you may reuse the bowl you used for the cake). Start mixing with a hand or stand mixer on low, then increase the speed to high until all the ingredients are incorporated and smooth.
- Another cup of powdered sugar can be added if the frosting appears to be excessively runny. You may put it in the refrigerator for about 30 minutes if it's still a little runny to help it set up.
- After frosting the cake as desired, add some shredded coconut and plate it for serving. Enjoy!

8. Chocolate Coconut Cream Pudding
A dessert recipe for chocolate cream pudding only calls for three ingredients and is creamy, dairy-free, and coconut cream. Make this quick and simple chocolate pudding with coconut milk when a craving arises.
Prep time: 30 minutes | Cook time: 15 minutes | Total time: 45 minutes | Servings: 4
Ingredients
- Full-fat coconut milk: 15-ounce
- Cocoa powder: 2 tablespoons
- Coconut sugar or maple syrup: 2 tablespoons
- Cocoa nibs: 1-2 tablespoons
Method
- In coconut milk in a can, separate the coconut cream from the coconut liquid.
- For about 3–4 minutes, on medium-high, beat the coconut cream until it begins to resemble pudding (time may vary).
- Beat for another minute after adding cocoa powder and coconut sugar.
- Enjoy!

9. Vegan Chocolate Mousse
Whether vegan or not, this chocolate mousse may be the richest and creamiest you have ever tasted.
Prep time: 5 minutes | Cook time: 5 minutes | Total time: 10 minutes | Servings: 1
Ingredients
- Coconut milk or cream: 1 can
- Cocoa powder: ¼ cup
- Dutch cocoa powder: 1 tablespoon
- Powdered sugar: 3-4 tablespoons
- Pure vanilla extract: ½ teaspoon
- Peanut butter: 2-3 tablespoons
Method
- The coconut milk container should be chilled overnight or opened and briefly frozen. Use only canned, full-fat coconut milk in this recipe. Because you want the cream to separate from the water beneath, try not to jiggle the can.
- Once the can has cooled, open it and only remove the thick portion to a basin. Save the watery portion for another dish or discard it. Whip the cream until smooth with a stand mixer, hand beaters, or a fork and a lot of strength and endurance.
- Whip while adding the remaining ingredients until a mousse-like consistency is achieved. My kids like the vegan chocolate mousse very much.
Conclusion
Although I have shared many recipes on this blog that contain coconut, every single coconut recipe is easy to make and suitable for beginners. Hope your kids will love it all very much.
I trust you enjoyed this article about the 9 Best Vegan Coconut Dessert Recipes For Your Kids. Please stay tuned for more blog posts to come shortly. Take care!
JeannetteZ
>>>Want To Learn How To Create Delicious, Cruelty-Free, Healthy AND 100% Vegan Meals? Try These Awesome Vegan Cooking Courses With A Free 7-DAY MEMBERSHIP<<<
Your Opinion Is Important To Me
Ideas? Thoughts? Questions? I would love to hear from you. Would you please leave me your questions, experience, and remarks about this article on the 9 Best Vegan Coconut Dessert Recipes For Your Kids in the comments section below? You can also reach me by email at Jeannette@LivingTheVeganLifestyle.org.
Disclosure
This post may contain affiliate links. I earn from qualifying purchases as an Amazon Associate and other affiliate programs. Read my full disclosure.
Here are links to some of my favourite articles:
7 Delicious Vegan Sweet Potato Recipes For Your Kids
6 Healthy Vegan Stew Recipes With Dumplings For Your Kids
10 Best Cheap Vegan Meals For Your Kids
8 Delicious Vegan Fish Recipes For Your Kids
10 Delicious Vegan Carrot Fries Recipes For Your Kids
11 Most Delicious Stevia Vegan Recipes For Your Kids
Reasons To Avoid Fish And Seafood And What I Can Eat Instead