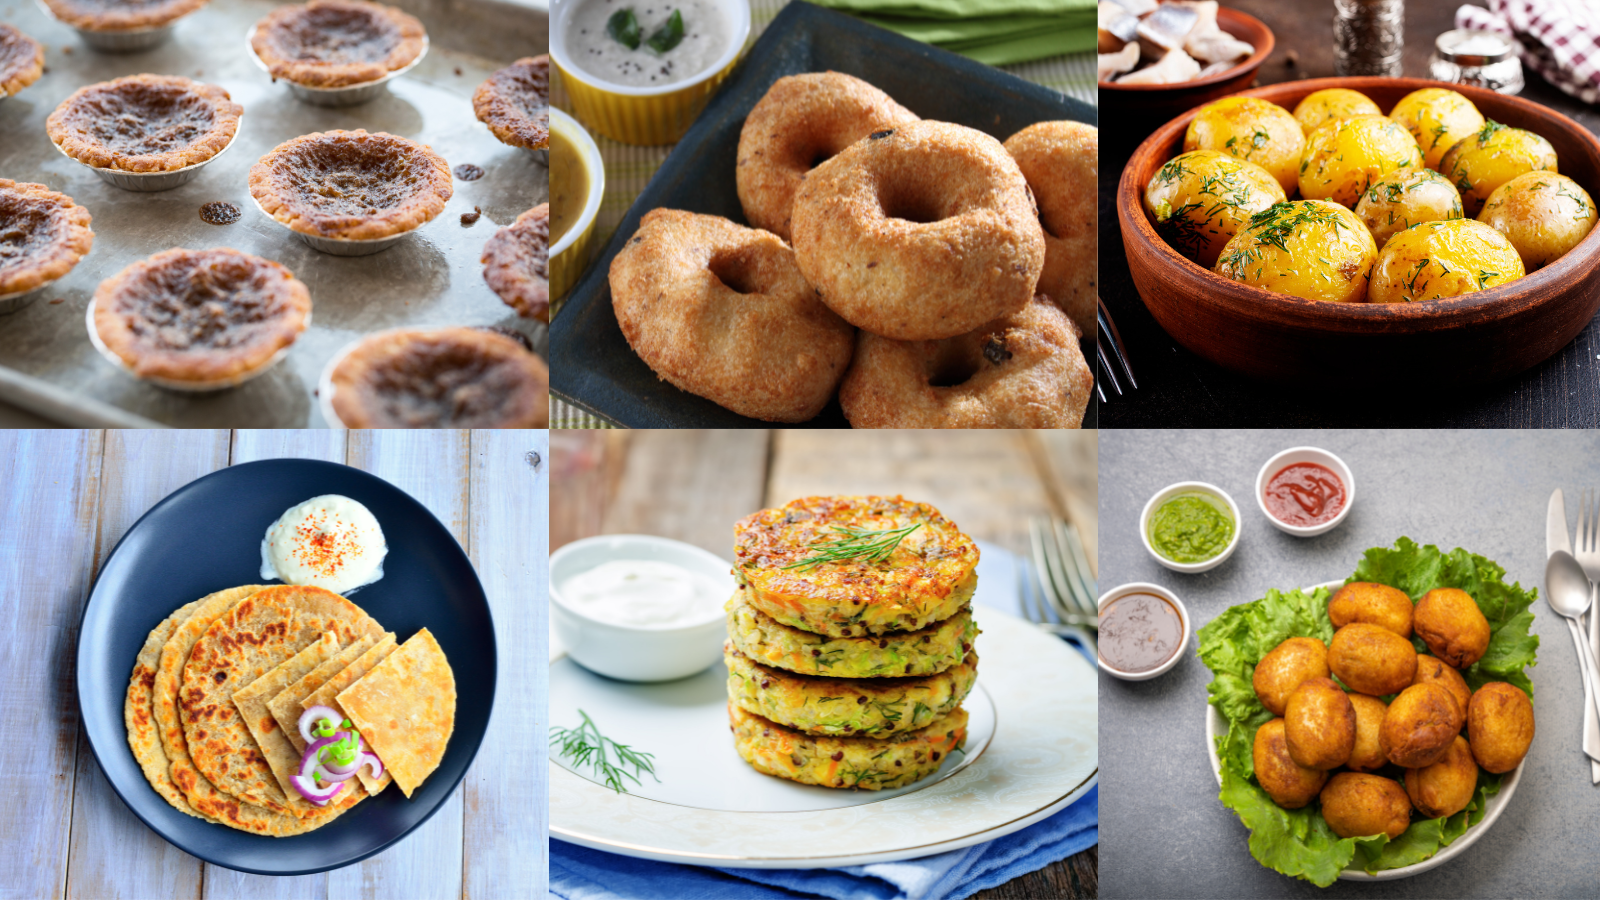
7 Best Vegan Diwali Snacks Recipes For Your Kids
7 Best Vegan Diwali Snacks Recipes For Your Kids
Diwali (or the festival of lights) is a Hindu holiday on October 24. It is one of the most awaited and stunning vacations in India.
It is a five-day, candle-lit Hindu celebration to honour Ganesha, the god of riches and remover of barriers, and Lakshmi, the goddess of wealth.
Many individuals celebrate by presenting gifts to loved ones and indulging in delectable Indian cuisine and sweets. While ghee, or clarified butter, is used in many Indian recipes, converting classic dishes to a plant-based diet is simple.
Here are this week's best goodies and munchies to help you celebrate Diwali in your home. Feel free to try them!

1. Vegan Onion Pakoras With Avocado Dipping Sauce
These vegan onion pakoras with avocado dipping sauce are vegetables coated with chickpea flour and deep-fried until crispy. The chickpea flour makes pakora a gluten-free Indian meal.
These onions pakoras are seasoned with curry powder, cumin, and garlic and come with a refreshing, hot, and creamy avocado dip. These would be ideal for any occasion as an appetizer or snack. You'll dazzle the visitors!
Prep time: 15 minutes | Cook time: 25 minutes | Total time: 40 minutes | Servings: 4
Ingredients For The Dipping Sauce
- Avocado: 1 ripe
- Lime Juice: 1
- Cilantro leaves: ¼ cup
- Sriracha: ½–1 teaspoon
- Garlic: 1 clove
- Coconut milk: ¼ cup
- Water: ¼ cup
- Salt and pepper to taste
- Cumin: 1 pinch
Ingredients For The Pakoras
- Brown onions: 2
- Chickpea flour: 1½ cups
- Baking powder: 1 teaspoon
- Water: ¾ cup, more as needed
- Mild curry powder: ½ teaspoon
- Cumin: ½ teaspoon
- Garlic powder: ½ teaspoon
- Turmeric: ¼ teaspoon
- Fresh cilantro: 1 tablespoon
- Salt and pepper to taste
- Vegetable oil for frying
- Cayenne pepper: 1 pinch
Method
- Blend on high until smooth after placing all ingredients in a blender. Add a tablespoon of water at a time if the sauce is too thick. Cover and store in the refrigerator.
- Put sliced onions in a medium basin. Mix in baking soda, spices, and chickpea flour. Pour water into the dish while stirring. It is necessary to hold the onions together quite firmly.
- In a cast-iron skillet, pour about 3 inches of vegetable oil—on medium heat. Add a little slice of onion to the pan. The oil is ready for frying if it sizzles.
- Put rounded tablespoons of the mixture in the pan. Take out and place on a paper towel to absorb any leftover oil after allowing it to cook evenly on both sides.
- With dipping sauce, serve hot.

2. Vegan Baked Vadas For Diwali
There isn't a South Indian party without vada, and you can now enjoy them baked rather than fried for a healthier alternative.
These vegan baked vadas are flavourful, crunchy, and crispy. Additionally, backing your vada simplifies cleanup and makes the dish more beneficial.
Prep time: 15 minutes | Cook time: 25 minutes | Total time: 40 minutes | Servings: 4
Ingredients
- Black lentils or urad dal: 1 cup
- Ginger: 1-inch piece
- Green chillis: 4
- Ice cubes: 5-7 large
- Onions: ¾ cup, chopped
- Curry leaves: 1 sprig
- Baking powder: ½ teaspoon
- Baking soda: ½ teaspoon
- Oil for brushing
- Salt to taste
- Water to soak the dal
- Fresh coriander: 1cup, chopped
Method
- Immerse the dal in water and soak it for 30 minutes.
- Remove most of the water from the pot, but leave about ⅛ cup for the dal.
- Add salt, ginger, and green chillies to the dal.
- Add a few ice cubes while you blend the mixture into a smooth paste. Repeat this process until the batter is thick and lump-free.
- Add the minced onion, chopped cilantro, baking powder and soda.
Method To Bake The Vada
- Preheat the oven to 450°F (230°C)
- Brush plenty of oil into the doughnut pan. At the base, puddles are OK.
- Put a spoonful of batter in the doughnut pan.
- Spread the batter out evenly and add a little oil to the top. Ensure that oil is applied evenly to the top surface. 12 minutes of baking at 450°F.
- Remove from the oven, turn the vadas in the pan, and bake for 10 more minutes.
- After completing them, set the vadas on a wire rack to cool before serving them with coconut chutney and sambar.

3. Vegan Mushroom Paniyaram – Indian Steamed Savoury Cakes
This vegan mushroom paniyaram is a typical South Indian dish. It is prepared by steaming a lentil and rice batter in a pan with circular moulds. Serve this paniyaram's mushroom masala with a roti or rice side dish.
In addition, you can substitute any of your preferred vegetables for the mushrooms. If you need a quick dinner to grab, this recipe is perfect for bringing for lunch. This delicious vegan mushroom Paniyaram is gluten-free and vegan.
Prep time: 15 minutes | Cook time: 25 minutes | Total time: 40 minutes | Servings: 4
Ingredients
- Idli/dosa batter: 2 cups
- Brown Bella mushrooms: 5 oz
- Chopped onion: ½ cup
- Chopped cilantro: 1 tablespoon
- Curry leaves: 5 to 7
- Oil: 2 teaspoons
- Mustard seeds: 1 teaspoon
- Urad dal/black gram: 1 teaspoon
- Chana dal/yellow split peas: 1 teaspoon
- Garam masala: ½ teaspoon
- Dagad Phool powder: ½ teaspoon
- Sea salt: 1 teaspoon
- Pepper powder: ½ teaspoon
Method
- Clean, then finely cut the Bella mushrooms. Chop the cilantro and onion.
- Add oil after preheating the pan.
- Once the oil is hot, add the mustard seeds, urad dal, chana dal, and curry leaves.
- Onions should be diced and cooked till transparent after the mustard seeds begin to sputter.
- Add all the spice powders (garam masala, pepper powder, and Dagad Phool powder), salt, and chopped mushrooms.
- Prepare it thoroughly, cover it, and cook it for two minutes. Never include water.
- Cook without the lid until the liquid has completely evaporated.
- Mix well before including the chopped cilantro.
- Allow this mixture to cool somewhat.
- After incorporating the prepared mushroom masala, thoroughly combine the paniyaram batter.
- When it is hot, pour the mushroom masala batter into the mould to the ¾ mark, and then wait a minute for it to cook.
- Flip paniyarams using the paniyaram stick, then cook for 45-60 seconds.
- Very carefully remove it from the pan. You may use the leftover batter to make paniyarams similarly.

4. Vegan Air Fryer Indian Potato Bread Rolls
These vegan air fryer Indian potato bread rolls are a mouthwatering Indian snack. These bread rolls packed with a spicy potato filling are healthier due to baking (in the air fryer) rather than deep-frying. Having fun with these is guilt-free!
Prep time: 20 minutes | Cook time: 35 minutes | Total time: 45 minutes |Servings: 9
Ingredients
- Yukon gold potatoes: 2 large
- Cumin seeds: ½ teaspoon
- Ginger garlic paste: ½ tablespoon
- Chilli: 1, finely chopped
- Frozen green peas: ½ cup
- Turmeric powder: ¼ teaspoon
- Red chilli powder or cayenne pepper: ¼ teaspoon
- Cumin powder: ¼ teaspoon
- Garam masala: ¼ teaspoon
- Amchur powder: ½ teaspoon
- Coriander powder: 1 teaspoon
- Chopped onions: ½ cup
- Chopped cilantro leaves: 2-3 tablespoons
- Bread slices: 9
- Oil: 1 tablespoon
Method For The Air Fryer
- Cumin seeds are added to heated oil and allowed to crackle.
- Combined with finely chopped green chillis, add ginger-garlic paste. When transparent, add the finely chopped onions. Green peas are added and sauteed for one minute over medium heat.
- Add turmeric, coriander, cumin, and red chilli powder. On medium-low heat, sauté for an additional 30 seconds.
- Add potatoes to the pan after coarsely mashing them. Additional suggested ingredients include salt, amchur powder, and garam masala. Add cilantro leaves and lemon juice, and turn off the heat.
- Bring the stuffing to room temperature.
- Make nine equal cylinder-shaped patties out of the potato mixture.
- For three minutes, preheat the air fryer to 350°F. Take some water in a shallow dish, submerge the bread briefly, and then take it out immediately. If your bread slice is highly soft, don't dip it in water because it will become soggy; moisten your fingertips and flatten the slice.
- Pushing the bread slice between your palms, squeeze out every last bit of extra water.
- Place one potato mixture patty in the center of the slice of bread.
- Seal the rolls gently pushing and squeezing by bringing the four corners toward the center. Make sure the bread slice completely encloses the potato stuffing. In the air fryer basket, put the rolls. The bread rolls should have 1 tablespoon of oil applied on all sides.
- Bake for about 15 minutes or until golden brown on both sides.
Method For The Stovetop
- In a wok, heat enough oil. Ensure the oil is hot. Keep rotating the sides while you deep-fried the prepared buns. It should take one to two minutes to turn a golden brown colour. If the oil is not heated sufficiently, the bread rolls will absorb much oil. Test one roll to determine the ideal oil temperature for deep frying.
- You can shallow fry these rolls instead of deep frying them; keep turning them until they are evenly golden brown.

5. Vegan Baked Chakli – Indian Rice Fritters
This vegan baked chakli is a traditional deep-fried Indian snack made of rice, lentils, and other spices. They are a tasty snack that satisfies your want for something crunchy because this “quick” version uses rice flour and is baked rather than fried. They are delicious, crispy, spicy, and impossible to resist.
Prep time: 25 minutes | Cook time: 30 minutes | Total time: 55 minutes | Servings:30
Ingredients
- Rice flour: 1 cup
- Red chilli powder or cayenne pepper: 1 teaspoon
- Cumin seeds: 1 teaspoon
- Sesame seeds: 3 teaspoon
- Turmeric: ¼ teaspoon
- Vegetable shortening or oil: 1 teaspoon
- Vegan yogurt: ¼ cup
- Salt to taste
- Pepper to taste
- A pinch of asafoetida, garlic powder, or onion powder
Method
- Set the oven's temperature to 350°F (177°C).
- Mix rice flour, vegan yogurt, salt, pepper, asafoetida, turmeric, cumin seeds, and asafoetida in a bowl.
- Once you have a semi-soft dough, gradually add warm water and knead it.
- Beginning with the lubricated mixing sheet, spiralize the prepared dough using the chakli press. The dough can be formed into sticks by hand. If you need a chakli in a bowl, press it to produce them.
- Bake it for 25 to 30 minutes or until it is well cooked, turning it over once after 13 minutes.
- Chakli is now prepared. Cool it before storing it in an airtight container.
- These vegan chaklis can be kept in an airtight container for up to 2 weeks.

6. Vegan Indian Tofu Paratha Pocket Bites
With the chilled dairy-free raita, these spicy and tasty vegan Indian tofu paratha pocket bites make a filling supper or snack for Diwali.
The paratha, an Indian whole wheat flatbread baked at home, is stuffed with crumbled tofu and mashed kidney beans and seasoned with Indian seasonings. It is excellent, warm, and spicy, yet not intrusive.
Prep time: 20 minutes | Cook time: 30 minutes | Total time: 50 minutes | Servings: 6
Ingredients For The Raita
- Boondi: ¾ cup
- Boiled water: 1 cup
- Ice cold water: 1 cup
- Vegan yogurt: 1 cup
- Roasted cumin powder: ½ tablespoon
- Chopped coriander leaves: 1 tablespoon
- Sea salt to taste.
Ingredients For The Indian Tofu Stuffing
- Oil: 2 tablespoons
- Cumin seeds: 1 teaspoon
- Garlic: 1 tablespoon, chopped
- Ginger: 1 tablespoon, chopped
- Kidney beans: 1 cup, cooked
- Tofu: 1 cup, crumbled
- Red chilli powder: 1½ teaspoons
- Coriander powder: 2 teaspoons
- Garam masala powder: ½ teaspoons
- Chillis: 2, chopped
- Coriander: ¼ cup, chopped
- Onion: ¼ cup, chopped
- Lemon juice: 1 tablespoon
- Sea salt to taste.
Ingredients For The Paratha Dough
- Whole wheat flour: 2 cups
- Sea salt: 1 pinch
- Water for kneading
- Some extra wheat flour for dusting
- Vegan butter or oil for roasting.
Method For The Raita
- Boil the water, then let the boondi soak in it for two minutes. After 2 minutes of draining, repeat the soak in ice-cold water.
- Add the bowl after draining the extra water.
- Mix gently after adding yogurt, salt, coriander, and cumin powder. If necessary, add a little water.
- thirty minutes in the refrigerator
- Sprinkle some chilli powder on top and add chopped coriander leaves as garnish.
Method For The Indian Tofu Stuffing
- In a pan, heat the oil. Cut the seeds for the cumin, ginger, and garlic.
- Use the back of a spatula to cook and slightly mash. Include salt, coriander, chile, and garam masala powders.
- Stir well, then simmer for two minutes.
- Add the tofu and mix thoroughly. It takes three minutes to cook.
- Add the chopped onions, coriander, and chillies.
- Cook for one more minute after thoroughly mixing.
- Blend thoroughly after adding lemon juice.
- Immediately remove from the heat and let cool.
- Create eight equal portions of the prepared stuffing and set them aside.
Method For The Paratha
- Making a soft dough requires adding water, salt, and wheat flour. Make eight identically sized balls out of the dough.
- Roll out the ball into a circle or square by spreading it thinly. To hold the stuffing nicely, try to roll it out as thinly as possible without making it paper-thin.
- Fill the center with the Indian tofu filling.
- To conceal the contents, fold the paratha now. To properly seal the edges, lightly press them.
- Over moderate heat, preheat a pan. Place the packed pockets over medium heat and roast them on both sides.
- Once both sides are lightly oil-coated, roast the food until both are golden brown.
- Continue until the dough is the last ingredient.
- Separate into parts. You may now enjoy some bite-sized Indian tofu parathas.
- Serve with chilled raita.

7. Vegan Mint Chickpea Cornmeal Tarts
The vegan mint chickpea cornmeal tarts are the main ingredient in this tart-style Indian meal. They resemble tiny tarts packed with curries and are light, crispy, sweet, sour, aromatic, and flavourful.
Because of the spices and mint in this filling, it is incredibly cooling and mouthwatering. Raita, which you add at the end, is substituted with a dollop of herbed vegan yogurt. This addition makes the entire dish more vibrant and delicious.
Prep time: 10 minutes | Cook time: 40 minutes | Total time: 50 minutes | Servings: 10
Ingredients For The Mint Chickpeas
- Cooked chickpeas: 2 cups
- Mint leaves: 1½ cups
- Ginger, chopped: 1 tablespoon
- Garlic: 4 cloves
- Tomatoes: 2, diced
- Green chillis: 2
- Onions: 2, diced
- Dried mango powder: 2 teaspoons
- Chilli powder: 1½ teaspoons
- Chana masala: 2 teaspoons
- Garam masala powder: ½ teaspoon
- Water: ⅛ cup
- Sugar: 1 teaspoon
- Tamarind purée: 1 tablespoon
- Kasuri methi: 1 tablespoon
- Sea salt to taste.
Ingredients For The Herbed Yogurt
- Vegan Greek yogurt: ½ cup
- Cilantro: 2 tablespoons, chopped
- Green chilli: 1, chopped
- Cumin powder: ½ teaspoon
- Sea salt to taste.
Ingredients For The Cornmeal Tart
- Cornmeal: 1½ cups
- Salt to taste
- Warm water for kneading the dough
Ingredients For Serving
- Chopped red onions
- Mint leaves
Method For The Mint Chickpea Tarts
- In a food processor, combine mint leaves, ginger, garlic, tomato, green chillis, onion, dried mango powder, chilli powder, chana masala, salt to taste, and garam masala powder. Process all ingredients until they form a smooth mixture.
- Over medium heat, preheat a nonstick pan. Add cooked chickpeas as well as mint paste. Mix thoroughly and cook for 15 minutes, stirring once or twice.
- Add salt, sugar, Kasuri methi, and tamarind purée. Stir thoroughly and heat for 5 minutes. Remove from the heat and reserve.
Method For The Cornmeal Tart
- Combine all ingredients in a small bowl and mix. Season to taste and adjust. Set the oven to 355°F.
- Cornmeal should be salted and thoroughly combined. Create a medium-soft dough by mixing in warm water and thoroughly kneading. Make 10 to 12 balls the size of lemons out of the.
- Flatten each ball before placing it into a tart pan and gently press it in. Process the crusts with a fork. Bake the balls in a 355°F preheated oven until they are lightly golden (25 to 30 minutes). Remove from the pan to let them cool.
- Place a dollop of herbed yogurt on the chickpea curry before stuffing the shells. Place an onion and a mint leaf on top of each tart.
Conclusion
Diwali, the festival of lights, is ready to knock on our doors! That means it's time for loads of food, card games, home decorations, and, most importantly, indulging in every kind of mithai.
During Deepawali or Diwali, we typically worry about gaining weight. To prevent that, here are some healthy recipes you can quickly prepare at home and share with your friends and family without gaining weight.
I trust you enjoyed this article about the 7 Best Vegan Diwali Snacks Recipes For Your Kids. Please stay tuned for more blog posts to come shortly. Take care!
JeannetteZ
>>>Please click here to read my Vegan Travel Guides To World Destinations<<<
>>>Want To Learn How To Create Delicious, Cruelty-Free, Healthy AND 100% Vegan Meals? Try These Awesome Vegan Cooking Courses With A Free 7-DAY MEMBERSHIP<<<
Your Opinion Is Important To Me
Do you have thoughts, ideas, or questions? I would love to hear from you. Please leave me your questions, experiences, and remarks about this article on the 7 Best Vegan Diwali Snacks Recipes For Your Kids in the comments section below. You can also email me at Jeannette@LivingTheVeganLifestyle.org.
Disclosure
This post may contain affiliate links. I earn from qualifying purchases as an Amazon Associate and other affiliate programs. Please read my full disclosure.
Here are links to some of my favourite articles:
Reasons To Start Using Vegan Beauty Products
9 Best Vegan Strawberry Shortcake Recipes For Your Kids
7 Best Gumbo Recipes For Your Kids
8 Best Vegan Gyros Recipes For Your Kids
10 Best Vegan Doughnut Recipes For Your Kids